Powered by Blogger.
Showing posts with label android. Show all posts

Friday 22 August 2014

Tips to improve or boost your android phone and smart phone battery life

 Today's Android phones pack big bright screens and high-end features that suck plenty of power; here's how to squeeze the most juice out of your battery. 

Top-notch Android smartphones like the Samsung Galaxy  at Amazon and HTC One (M8) are powerful, but unfortunately, they don't have endless battery life. In fact, many Android phone users would be happy to make it through a single day, hoping that a nightly recharge is sufficient.

     Sadly, it sometimes isn't. A number of factors have conspired to reduce gadget endurance over the past several years. Thinner designs with less room for batteries, larger and brighter screens, faster quad-core processors, more software that runs in the background, and power-hungry GPS radios all share responsibility. The move from 3G to 4G networks a few years ago—particularly of the LTE variety—has also taken its toll.

   But there's much more to poor battery life results than that. Fortunately, there's plenty you can do to stem the flow of juice from your Android device. To write this article, I used a Google Nexus 5, as it's running the latest version of Android 4.4 KitKat with no extra interface enhancements, but these tips should apply across just about any Android phone. Try these tips to extend your handset's battery life:

   See what's sucking the most juice. Navigate to Settings > Battery to see an organized breakdown of what's consuming your phone's battery. Applications and features will display in a descending list of battery hogs. If you see an application you barely use or a feature you never use, you'll want to uninstall the app or turn off the feature.


Android Battery Tips


Read more...

Monday 18 August 2014

Step by Step for HOW TO TRANSFER CONTACTS FROM ANDROID PHONE TO SIM AND HOW TO IMPORT AND EXPORT OF CONTCT IN ANDROID PHONE

  You have important and useful contacts on your Android phone or android tab, Do you want protect your contact, and then you should export them to your SD card in case they get erased from your phone.please follow below easy steps.

Export contact to SD card:


  •   Go to Contacts   >   press Menu key (option key   “= “)
  •   Select    Import/Export   
  •   Select Export to SD Card
  • Confirm your export press OK 
Within a few seconds, you will have all the contacts saved on your SD card. You can see your SD card VCF file.

Import contact from SD card
  •  Go to Contacts   >   press Menu key
  • Select    Import/Export   
  • Select import from SD card    
  • Select    phone     (import contact save storage)

Read more...

Saturday 26 July 2014

Backup the data of deleted contacts in android phones

 Data recovery in android phones

Some people may accidentally delete their contacts from Android. How to get those important contacts back? When you deleted contacts from Android, they were not really gone, but only marked as useless on your phone and could be overwritten by new data. Therefore, you'd better stop using your phone after losing your contacts, to ensure a higher rate of recovery.

Simple steps for recover the deleted contacts in android phone:

  •  Connect your Android mobile phone to the computer (enable USB debugging)
  •  Download android data recovery software for pc or laptop.
  •  Before connect the android phone usb debugging ON.
  •  Install the android drivers automatically when connected to pc or laptop.
  • After that Run the data recovery software on pc or laptop.
  • Start the scan android phone.
  • Then appear the screen contacts,images,videos and select contacts.
  • Then you will be getting contacts one by one in csv file format or jpeg format


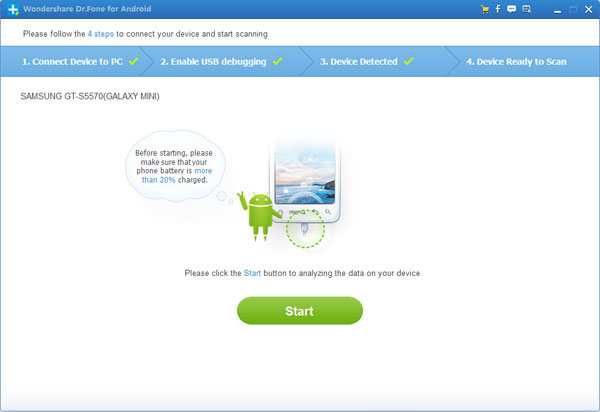
ou'll get the main window below.
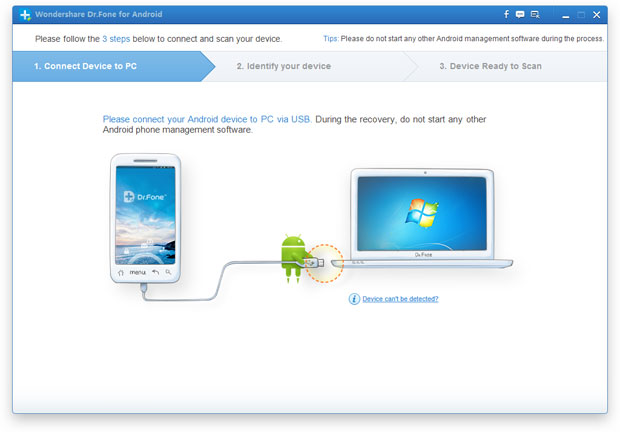
If you didn’t enable USB debugging on your device, you’ll see the window below. Follow the detailed expression below. There are three different ways to finish this job for different Android system:
Note: If you have already enabled USB debugging on your device before, you can skip this step.
  • 1) For Android 2.3 or earlier: Enter "Settings" < Click "Applications" < Click "Development" < Check "USB debugging"
  • 2) For Android 3.0 to 4.1: Enter "Settings" < Click "Developer options" < Check "USB debugging"
  • 3) For Android 4.2 or newer: Enter "Settings" < Click "About Phone" < Tap "Build number" for several times until getting a note "You are under developer mode" < Back to "Settings" < Click "Developer options" < Check "USB debugging"
- See more at: http://www.android-recovery-transfer.com/recover-deleted-contacts-from-android-phone.html#sthash.cXZeEMn8.dpuf

Step 1. Connect your Samsung mobile phone to the computer (enable USB debugging)

Download, install and run Android Data Recovery on your computer, and you'll get the main window below.

- See more at: http://www.android-recovery-transfer.com/recover-deleted-contacts-from-android-phone.html#sthash.cXZeEMn8.dpuf

ownload, install and run Android Data Recovery on your computer, and you'll get the main window below.

If you didn’t enable USB debugging on your device, you’ll see the window below. Follow the detailed expression below. There are three different ways to finish this job for different Android system:
Note: If you have already enabled USB debugging on your device before, you can skip this step.
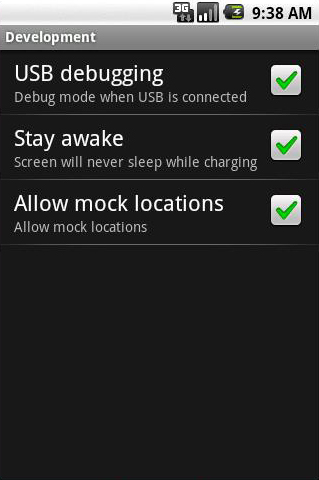
  • 1) For Android 2.3 or earlier: Enter "Settings" < Click "Applications" < Click "Development" < Check "USB debugging"
  • 2) For Android 3.0 to 4.1: Enter "Settings" < Click "Developer options" < Check "USB debugging"
  • 3) For Android 4.2 or newer: Enter "Settings" < Click "About Phone" < Tap "Build number" for several times until getting a note "You are under developer mode" < Back to "Settings" < Click "Developer options" < Check "USB debugging"
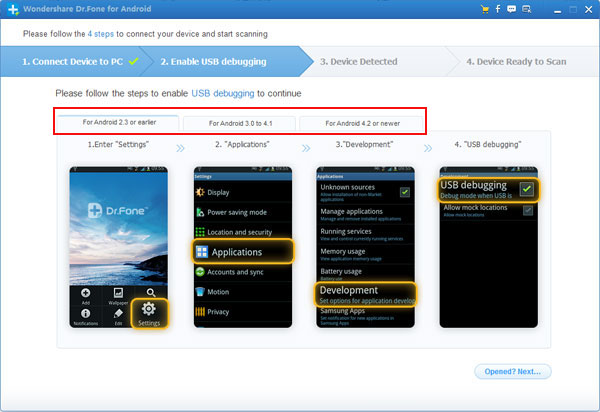
Then connect your Android device to the computer and move to the next step.

Step 2.  Analyze and scan your Android device for lost contacts

After the program detected your Android device, you'll get a window below. Before scanning your device, let the program analyze it by clicking “Start” button.

The analysis will take you a few seconds. After that, you'll get a window as follows. As the window shows, click "Allow" button on your Android device's screen to permit the Superuser Request. Then click "Start" button on the program's window to begin the scan.
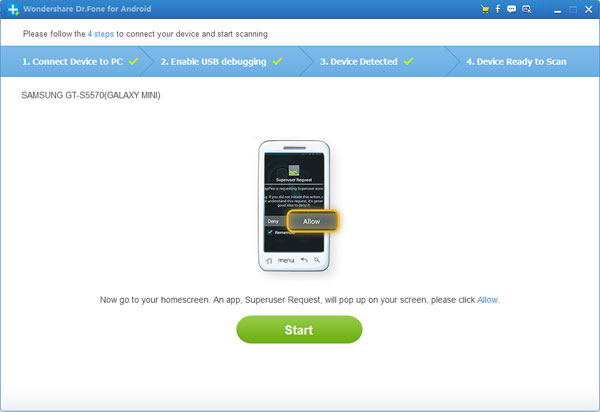
Step3. Preview and restore contacts from Android phones

After the scan, it will remind you when all contacts and messages have been scanned out. Then you can stop it and preview all your contacts. Mark the data those you want to get back and click "Recover" button to save them on your computer.

- See more at: http://www.android-recovery-transfer.com/recover-deleted-contacts-from-android-phone.html#sthash.cXZeEMn8.dpuf
ownload, install and run Android Data Recovery on your computer, and you'll get the main window below.

If you didn’t enable USB debugging on your device, you’ll see the window below. Follow the detailed expression below. There are three different ways to finish this job for different Android system:
Note: If you have already enabled USB debugging on your device before, you can skip this step.
  • 1) For Android 2.3 or earlier: Enter "Settings" < Click "Applications" < Click "Development" < Check "USB debugging"
  • 2) For Android 3.0 to 4.1: Enter "Settings" < Click "Developer options" < Check "USB debugging"
  • 3) For Android 4.2 or newer: Enter "Settings" < Click "About Phone" < Tap "Build number" for several times until getting a note "You are under developer mode" < Back to "Settings" < Click "Developer options" < Check "USB debugging"

Then connect your Android device to the computer and move to the next step.

Step 2.  Analyze and scan your Android device for lost contacts

After the program detected your Android device, you'll get a window below. Before scanning your device, let the program analyze it by clicking “Start” button.

The analysis will take you a few seconds. After that, you'll get a window as follows. As the window shows, click "Allow" button on your Android device's screen to permit the Superuser Request. Then click "Start" button on the program's window to begin the scan.

Step3. Preview and restore contacts from Android phones

After the scan, it will remind you when all contacts and messages have been scanned out. Then you can stop it and preview all your contacts. Mark the data those you want to get back and click "Recover" button to save them on your computer.

- See more at: http://www.android-recovery-transfer.com/recover-deleted-contacts-from-android-phone.html#sthash.cXZeEMn8.dpuf
ownload, install and run Android Data Recovery on your computer, and you'll get the main window below.

If you didn’t enable USB debugging on your device, you’ll see the window below. Follow the detailed expression below. There are three different ways to finish this job for different Android system:
Note: If you have already enabled USB debugging on your device before, you can skip this step.
  • 1) For Android 2.3 or earlier: Enter "Settings" < Click "Applications" < Click "Development" < Check "USB debugging"
  • 2) For Android 3.0 to 4.1: Enter "Settings" < Click "Developer options" < Check "USB debugging"
  • 3) For Android 4.2 or newer: Enter "Settings" < Click "About Phone" < Tap "Build number" for several times until getting a note "You are under developer mode" < Back to "Settings" < Click "Developer options" < Check "USB debugging"

Then connect your Android device to the computer and move to the next step.

Step 2.  Analyze and scan your Android device for lost contacts

After the program detected your Android device, you'll get a window below. Before scanning your device, let the program analyze it by clicking “Start” button.

The analysis will take you a few seconds. After that, you'll get a window as follows. As the window shows, click "Allow" button on your Android device's screen to permit the Superuser Request. Then click "Start" button on the program's window to begin the scan.

Step3. Preview and restore contacts from Android phones

After the scan, it will remind you when all contacts and messages have been scanned out. Then you can stop it and preview all your contacts. Mark the data those you want to get back and click "Recover" button to save them on your computer.

- See more at: http://www.android-recovery-transfer.com/recover-deleted-contacts-from-android-phone.html#sthash.cXZeEMn8.dpuf

Step 1. Connect your Samsung mobile phone to the computer (enable USB debugging)

Download, install and run Android Data Recovery on your computer, and you'll get the main window below.

- See more at: http://www.android-recovery-transfer.com/recover-deleted-contacts-from-android-phone.html#sthash.cXZeEMn8.dpuf

Read more...

Tuesday 5 March 2013

xda developers for android phones is great job really thanks

xda developers :
              Xda developers really great job for android phones,phones like samsung,sony ericsson,some other like micromax,celkon,karbon mobiles.
           Mobile users always wants to change their mobile appearance and performance. they are operating system changing via sdk rom that is called operating system (os),all operating systems developed by xda developers.
    We can change operating system on android phones  by unlocking the android phone, that is rooting its very difficult to rooting for mobile.while rooting android phones may damage phone that is called dead,
we can do rooting step carefully by xda developers site.xda developers can solve all types of solutions for android.

Read more...

Saturday 19 January 2013

HOW TO CONNECT WIFI IN MOBILE PHONES-HOW TO CONNECT WIFI IN ANDROID PHONES

How to connect wifi in android phones:
 
    If your mobile phone is a top of the range model it will have WiFi connectability in addition to 3G (or similar) cellular network broadband.

The WiFi is intended to connect to strictly local area networks .such as WiFi hotspots in cafes or your home wireless router's internet connection. To use hotspots you may have to pay or perhaps get the staff to guide you on settings.

You may be able to detect other people's private WiFi signals but, these days, most apply wireless security and unless you have the password you won't be able to connect.

Simple steps :
  1. switch on wifi connection on your mobile
  2. searching for wifi  connection if wifi available in your area shows top on screen 
  3. then go to settings click on wifi settings 
  4. then click on wifi you have found network
  5. then automatically connected to wifi network then you can browse internet on mobile

Read more...

Sunday 23 December 2012

How to connect Android Phone to computer

To manage your android phone sms on computer direclty, you need to connect your android phone to computer first. You can connect it via USB/WIFI. Here is the step by step guides:
1 Connect via USB
2 Connect via WIFI

1. Connect via USB

  • Step 1: Check these on your phone settings. (skip if done)
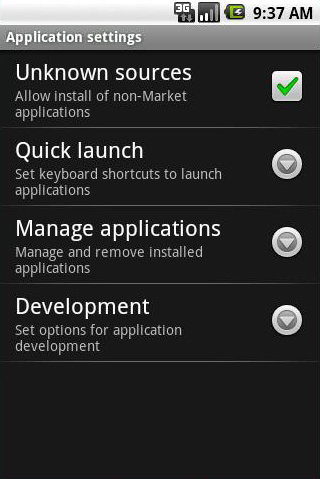
    1. Settings -> Application settings -> Unknow sources.
    2. Settings -> Application settings -> Development -> USB debugging.

    backup SMS from Android to computer How to connect Android Phone to computer
  • Step 2: Install the USB driver for your android Phone on computer
    Install the USB driver you got from your android phone Manufacturer. It was always in a cd given to you when you bought your android phone. If you don't have one, you can go to the manufacturer's Web site, search and download the correct phone USB driver to install or contact the manufacturer directly.

  • Step 3: Install and run VeryAndroid SMS Backup on your Phone
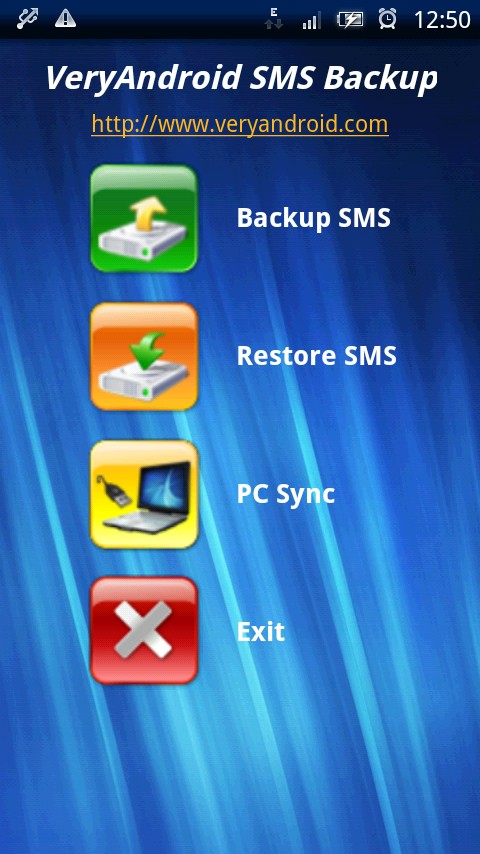
    Free download and install VeryAndroid SMS Backup on your Android phone (Step by step guide). Or you can go to the Market (Google Play) on your android to find and install VeryAndroid SMS Backup. Run the SMS Backup software on your phone and you will see this screen:

    How to connect Android Phone to computer
  • Step 4: Start PC Sync Service
    Click the "PC Sync" button. Then input a port info or wifi address and then click "Start" button.

Read more...

Tuesday 4 December 2012

How to Root the Samsung Galaxy Y GT-S5360

 
 SIMPLE STEPS:

The Galaxy Y (GT-S5360) has been around for enough time and been popular enough to catch the eyes of the developers and has hence been rooted, paving the way for custom ROMs on this affordable device.  This How To will show you how to take that first step and experience at least some of what the big guns get to do.
I.  Before You Begin 1.  A full charge is recommended to prevent any mishaps due to the battery draining out during the procedure.
2.  Enable USB Debugging on the Galaxy Y – to do this, head to Settings -> Applications -> Development and check the box next to Enable USB Debugging.
3.  Make sure that Samsung Kies or any other application that might interfere with the process are running on your Windows PC.
4.  Create a backup of all your data before proceeding – this is not mandatory but it’s always good to have something to roll back to if anything goes wrong.
II.  Rooting the Phone 1.  Download the necessary root package here.
2.  Copy the downloaded update.zip file to the top folder of the micro SD card – do not extract it.
3.  If plugged in, unplug the handset from the PC and turn it off.
4.  Put it into recovery mode – to do this, press and hold the volume up key + home key (the middle button on the front of your device) and press the power button until it goes into recovery mode.
5.  Select Apply update from SD card and locate the update.zip file you copied to the micro SD card.  Press the volume up or down to navigate and then the power button to select the option.
6.  Let the rooting process complete.  When done, select Reboot system now to restart the device.
Your Galaxy Y should now be rooted....!

Read more...

Sunday 2 December 2012

Android PC Suite - Latest versions

android pc suite not required for connecting internet via phone,you need only pdanet for android phone and pc synchronising.It is easy plug and play pdanet should be instal both of the pc and as well as phone.
   You can download pdanet on google play its absolutely free of cost......

Read more...

Thursday 26 July 2012

Android PC Suite - Latest versions for your android mobiles

Read more...
Related Posts Plugin for WordPress, Blogger...

Random Posts

Recent Comments

Total Pageviews

Search This Blog

About Template

Digital Solutions - Technology Blog

  © Blogger templates ProBlogger Template by Ourblogtemplates.com 2008

Back to TOP