Powered by Blogger.
Showing posts with label technology. Show all posts

Tuesday 16 September 2014

step by step for how to Connect Laptop to TV for Video Games

How to Connect Laptop to Television For Enjoying Video Games.

 
         There are several ways to turn a big-screen TV into your new computer monitor and enjoy video games, web content, and photos like never before.

         It doesn't matter if you're a Mac or PC, we've got laptop buying and maintenance tips for everyone in these Howcast videos, like how to fix a stuck laptop key, how to clean a laptop screen, and how to connect your laptop to your television.

Step 1.    
         First, connect a video cable – you've got several choices. For PC users, an easy option is an S-Video cable. Most PCs and digital televisions are equipped with an S-Video port. 

Step 2.
         If you have an older HDTV, try a VGA cable, which produces better picture quality and works with both Macs and PCs. To connect, turn off your laptop and your TV. Find the trapezoid-shaped VGA outlets on the TV and on your laptop. Once you're connected, power everything back on.

Step 3.
         You can also connect with a DVI video cable. A DVI connection is a step above VGA in picture quality, but only newer computers and HDTVs come with DVI ports. Connect as with a VGA cable.

Step 4.
         If your HDTV doesn't have a DVI connector, use a cable that is HDMI on one end, and DVI on the other to connect to your laptop.

Step 5.
        Hook up the audio. After you've connected your laptop to the TV via video cable, connect the mini-to-RCA cable from your computer’s headphone jack to your TV. 

Step 6.
        A final PC option is to go wireless, using a converter box and the software that comes with it. Using a VGA cable, plug the box into your TV and install the software onto your computer. The box will then convert your computer's VGA signal to the TV, and transfer both video and audio. 

Step 7.
        If you have a PC, go to the Control Panel and adjust the display settings to accompany double display on both your monitor and TV set. Mac laptops should automatically adjust for double display. If yours doesn't, go to System Preferences, click on Display, and then Detect Displays. 

Step 8.
        Click your TV's video source – usually a button called "input" or "TV/Video" on your remote – until your laptop comes up. You're set!

Read more...

Thursday 28 August 2014

Step by Step for How to get more traffic to your blogspot blogs for new bloggers

 Way to improve more traffic for your blogspot blogs :


     Link building is hard, but it's not the only way to make traffic gains in Google's search results.
When I first started SEO, building links wasn't my strong suit. Writing outreach emails terrified me, and I had little experience creating killer content. Instead, I focused on the easy wins.
     While off-page factors like links typically weigh more heavily than on-page efforts in Google's search results, SEOs today have a number of levers to pull in order to gain increased search traffic without ever building a link.
      For experienced SEOs, many of these are established practices, but even the most optimized sites can improve in at least one or more of these areas.
Best articles for visitors:
    According to the MozCast Feature Graph, 6% of Google search results contain In-depth articles. While this doesn't seem like a huge numbers, the articles that qualify can see a significant increase in traffic. Anecdotally, we've heard reports of traffic increasing up to 10% after inclusion.
Best articles

Improving blog speed:
   Improving site speed not only improves visitor satisfaction (see point #1) but it may also have a direct influence on your search rankings. In fact, site speed is one of the few ranking factors Google has confirmed.
   One of the interesting things we learned this year, with help from the folks at Zoompf, is that actual page load speed may be far less important than Time to First Byte (TTFB). TTFB is the amount of time it takes a server to first respond to a request.
   As important as page speed is for desktop search Google considers it even more important for mobile devices. Think about the last time you waited for a page to load on your cell phone with a weak signal.

SEO Tools:

     Aside from speed, if your website isn't configured properly for smartphones, it probably results in lower Google search results for mobile queries. Google confirms that smartphone errors may result in lower mobile rankings.
 What is a smartphone error? It could include:
  • Redirecting visitors to the wrong mobile URL
  • Embedding a video that doesn't play on a particular phone (Flash video on an iPhone, for example)
  • Pop-ups that aren't easily closed on mobile
  • Buttons or fonts that are too small on a mobile device
     Google recommends making your site responsive, but many of the top brands in the world, including Apple.com, don't have responsive sites. Regardless, a good mobile experience is imperative.

   Social annotations with Google+:


     When you share content on Facebook and Twitter, your network basically sees it only when they are looking at Facebook and Twitter.
    On the other hand, when you share content on Google+, your network can see it every time they search Google.
   Google's own research shows that users fixate on social annotations, even when presented with videos and other types of rich snippets.
The easiest way to take advantage of this is to expand your Google+ network and share good content regularly and often. Rand Fishkin elegantly explains how to use Google+ to appear in the top of Google results every time.
Additionally, content shared through Google+ often ranks in regular search results, visible to everyone on the web, regardless of their social connections.

   Snippet optimization:

    This goes back to basic meta tag and title tag optimization, but it's a good practice to keep in mind.
In the past two years, Google changed the maximum length of title tags so that it's no longer dependent on the number of characters, but on the number of pixels used, generally around 500 pixels in length. This keeps changing as Google tests new layouts.

Read more...

The Suitable Solution for Direct10 Kilo Volts Supply


      If you have an application, where you work with kilo volts and you need a suitable diode, we have a solution for you.

It´s not a quite common thing, to find a diode with a reverse voltage of more than 1000V in your “home-drawer stock”. But you develop a device, requiring a diode with a substantially higher reverse voltage and nothing suitable is by a hand …
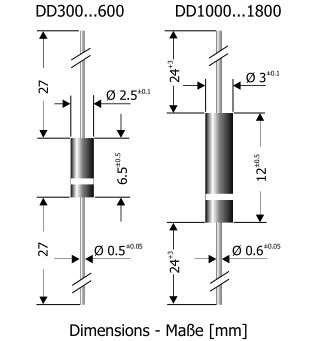
The help is simple - use the DD1000 diode or in case of higher currents, choose a suitable type from the portfolio of High-voltage types from Diotec and send us your requirement. DD1000 features VRRM up to 10 000V, but in respect to its small dimensions and a construction, it´s suitable only for currents up to 20mA. This is sufficient for construction of various testers, voltage multipliers and similar. Should you require higher currents, many suitable types are available, which still maintain compact dimensions. For more powerful designs, it´s possible to use for example a cylinder type SI-A with a screw connection allowing for simple series connection.


Read more...

Wednesday 27 August 2014

Step by Step for Internet Movies And Videos Watch on TV From The Web


    Watch videos And Movies are as Big Screen

     If you want watch Internet movies  and videos on big screen, you are not interested to see on small display like computer monitor  the videos are television shows youtube videos and cricket live matches etc..

You can View the Internet Videos on TV

Apple Tv :

       Apple-TV you can watch the videos on tv by connecting the HDMI port or composite video cable and also you can download videos same like computer.
and also browse the videos and internet on tv such as music and radio stations etc.

      Apple tv also used for watching youtube videos and listening music from radio stations. Apple-TV connect to the internet through ethernet  and built in Wi-Fi.

Roku Player :

      If you want use cheap device for watching tv from web or internet you may use Roku player watch streaming videos from netflix or amazon on you tv . Roku player can quick access to video channels like Netflix and amazon on demand.


Vudu Box :

      If you want watch HD videos from internet then you should by Vudu player this device you can buy or rent this device. Watch high quality videos vudu player is best choice. You can also watch HD videos on big screen on tv.


Boxee box :

     Boxee box is the free media for watching videos by installing the software on pc or laptop,the access content of variety of sources like youtube,CNN,Netflix,Univercity lectures etc..
Boxee box company also devoloped the set box for directly on tv.


Read more...

Friday 22 August 2014

Tips to improve or boost your android phone and smart phone battery life

 Today's Android phones pack big bright screens and high-end features that suck plenty of power; here's how to squeeze the most juice out of your battery. 

Top-notch Android smartphones like the Samsung Galaxy  at Amazon and HTC One (M8) are powerful, but unfortunately, they don't have endless battery life. In fact, many Android phone users would be happy to make it through a single day, hoping that a nightly recharge is sufficient.

     Sadly, it sometimes isn't. A number of factors have conspired to reduce gadget endurance over the past several years. Thinner designs with less room for batteries, larger and brighter screens, faster quad-core processors, more software that runs in the background, and power-hungry GPS radios all share responsibility. The move from 3G to 4G networks a few years ago—particularly of the LTE variety—has also taken its toll.

   But there's much more to poor battery life results than that. Fortunately, there's plenty you can do to stem the flow of juice from your Android device. To write this article, I used a Google Nexus 5, as it's running the latest version of Android 4.4 KitKat with no extra interface enhancements, but these tips should apply across just about any Android phone. Try these tips to extend your handset's battery life:

   See what's sucking the most juice. Navigate to Settings > Battery to see an organized breakdown of what's consuming your phone's battery. Applications and features will display in a descending list of battery hogs. If you see an application you barely use or a feature you never use, you'll want to uninstall the app or turn off the feature.


Android Battery Tips


Read more...

Monday 18 August 2014

Step by Step for HOW TO TRANSFER CONTACTS FROM ANDROID PHONE TO SIM AND HOW TO IMPORT AND EXPORT OF CONTCT IN ANDROID PHONE

  You have important and useful contacts on your Android phone or android tab, Do you want protect your contact, and then you should export them to your SD card in case they get erased from your phone.please follow below easy steps.

Export contact to SD card:


  •   Go to Contacts   >   press Menu key (option key   “= “)
  •   Select    Import/Export   
  •   Select Export to SD Card
  • Confirm your export press OK 
Within a few seconds, you will have all the contacts saved on your SD card. You can see your SD card VCF file.

Import contact from SD card
  •  Go to Contacts   >   press Menu key
  • Select    Import/Export   
  • Select import from SD card    
  • Select    phone     (import contact save storage)

Read more...

Tuesday 12 August 2014

Blog template importance and how to improve the blog traffic

Blog traffic is most important thing for earn money from google adsense or other adsense. I would like to discuss about blog traffic

Simple steps for getting traffic:
  1. When you are creating blog you must add meta description on template design.
  2. After create the blog on blogger.com post some posting with lables and description in every post.
  3. Description should have post description sentences must.
  4. Add the some search traffic sources in your blog like google search and yahoo.
  5. Keep comments on other blogs about their blog.
  6. Use google adwords.
  7. paste the blog url on other blogs.
  8. paste the blog url on social services such as facebook etc
If you done all of these steps you can make it good traffic

Read more...

Step by Step for How do i connect laptop to tv and it is simple way and make it easy

Your laptop screen is not the best medium for watching movies on, unless you enjoy squinting at a cramped display, of course. Thankfully, piping digital media - online and off - to your TV has never been easier, so whether you're looking for the right cable to physically connect your laptop and TV, or you want to investigate wirelessly streaming content to your television, you've come to the right place.

What do I need to connect my laptop to my flat-screen TV?

All flat-screen TVs offer at least one HDMI port on the back for connecting to external devices, and the same is true for practically all laptops manufactured in the last five or six years. HDMI is by far the best cabled solution available because not only does it support Full HD (and beyond) signals, but you only need one cable to carry both video and audio from your laptop to your TV.
You could spend a small fortune on expensive HDMI cables, but the truth of the matter is that for HD video transmitted from your laptop, any HDMI cable will do. Lindy is just one company that manufactures a wide range of cables of varying lengths at affordable prices.

Read more...

How do i connect laptop to tv

Your laptop screen is not the best medium for watching movies on, unless you enjoy squinting at a cramped display, of course. Thankfully, piping digital media - online and off - to your TV has never been easier, so whether you're looking for the right cable to physically connect your laptop and TV, or you want to investigate wirelessly streaming content to your television, you've come to the right place.

What do I need to connect my laptop to my flat-screen TV

All flat-screen TVs offer at least one HDMI port on the back for connecting to external devices, and the same is true for practically all laptops manufactured in the last five or six years. HDMI is by far the best cabled solution available because not only does it support Full HD (and beyond) signals, but you only need one cable to carry both video and audio from your laptop to your TV.
You could spend a small fortune on expensive HDMI cables, but the truth of the matter is that for HD video transmitted from your laptop, any HDMI cable will do. Lindy is just one company that manufactures a wide range of cables of varying lengths at affordable prices.

Read more...

Tuesday 5 August 2014

Bi-Colured LED Blinking Circuit and Dancing circuit or flashing circuit Make it Easy

    LED (Light Emitting Diode) is a semiconductor light emitting diode. We know that diode allows the current in one direction and does not allow the reverse current which will affect the components in the circuit. LED also do the same function but will emit a small light when it allowed the current, which will give the sign or visual indication to the normal human that circuit is working. There are lots of applications using LEDs. They are mainly used for visual indication in any electronic devices, measuring and interacting with the process, displaying the pictures in TV or in any advertisement hoarding, etc.

Two LED blinking circuits are given below. First one is dancing bi-color LEDs (two different color LEDs) where the two color LED will run in sequence. In the second circuit, we will blink the LEDs in regular period of time.

Dancing Bi – Color LED Circuit:

Generally we use small voltage bulbs in the dancing bulbs. This circuit is mainly used in the occasions, decoration articles or in visual indication sign boards etc. In this project, we use bi-color LEDs for sequential running light.

Block Diagram of Bi-Color LED Circuit:

Block Diagram of Dancing Bi-color LEDs
Timer is used for setting the sequential flow rate for the bi-color LED panel. The CD4017 is a decade counter which provides the timing and will make the LED ON/OFF according to the time determined.
Main Components in this Circuit:
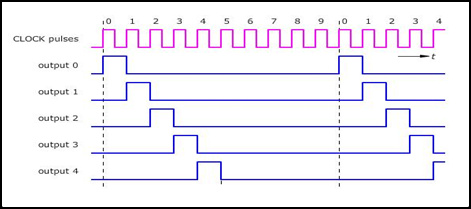
CD4017: CD4017 is a 16 pin decade counter and only 10 pins are used for output. The 4017 will get triggered by the clock pulses. Main operation of the decade counter is as follows: When a clock pulse is taken as an input, only one output is made high for first clock pulse and remaining all output pins will be made low. For the second clock pulse, another output pin is made high and remaining all pins are made low and so on. Time period of the output pin is high according to the width of the pulse. CD4017 is used in many applications where counter is needed.
CD4017 clock pulses from output pins timing diagram is shown below:
CD4017 Clock pulses from output pins timing diagram

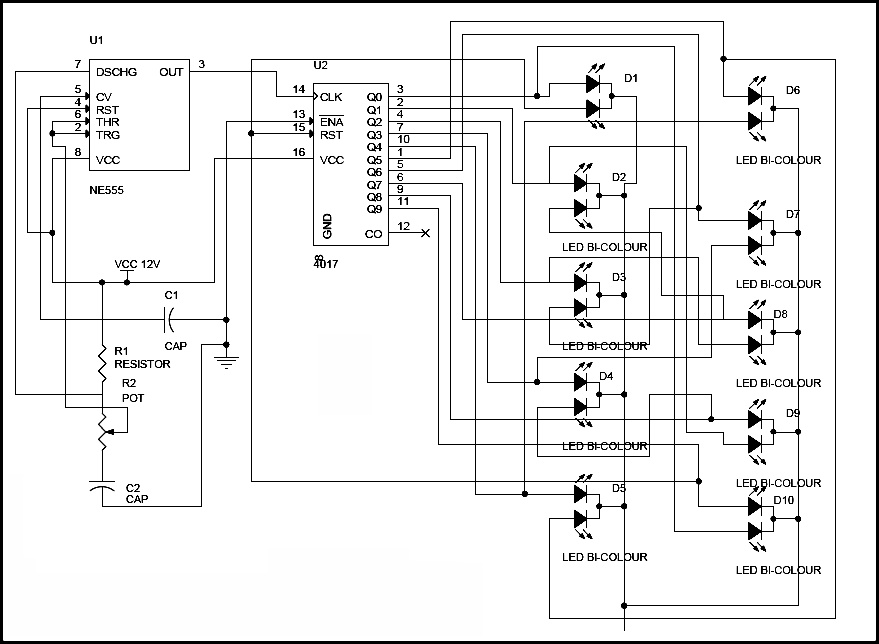
Bi-Color LED Dancing Lights Circuit Diagram:

Dancing LEDs Circuit Diagram
Circuit Diagram Explanation:
  • In the Bi-color LED, it should be connected to the counter as shown in the circuit. The anode of first LED in bicolor LED is connected to the anode of second LED of 10th bicolor LED and in the same fashion, the remaining LEDs are connected, only the second anode of first bicolor LED is connected to the reset pin of the CD4017. All the cathode of bicolor LEDs is made ground.
  • The main operation of this circuit depends on the 555 timer which is set in astable multivibrator mode and decade counter CD4017; the 555 timer will generate low frequency clock pulse and give input to the decade counter which will make the sequential running of the LEDs.
  • Variable resistor can vary the resistance which will change width of the pulse. If pulse width is changed, the time period of running the LEDs will also get changed. We run the LEDs in fast or slow. Running speed can be altered by variable resistor. The first anode of 10th bicolor LED is made short to the reset pin of the decode counter for continuous running of lights.

LED Flasher Circuit:

LED Flasher is a simple circuit which will blink the LEDs in regular time period. This circuit can be used for decoration purpose or can be used for a signaling purpose and many more.

Block Diagram of LED Flasher Circuit:

LED Flasher Block Diagram
The 555 timer is used to generate the PWM signal which will cause the LEDs to blink. The speed of the blinking by LED is determined by the potentiometer connected to the 555 timer. The PNP transistor is used to flash or blinks the LEDs.

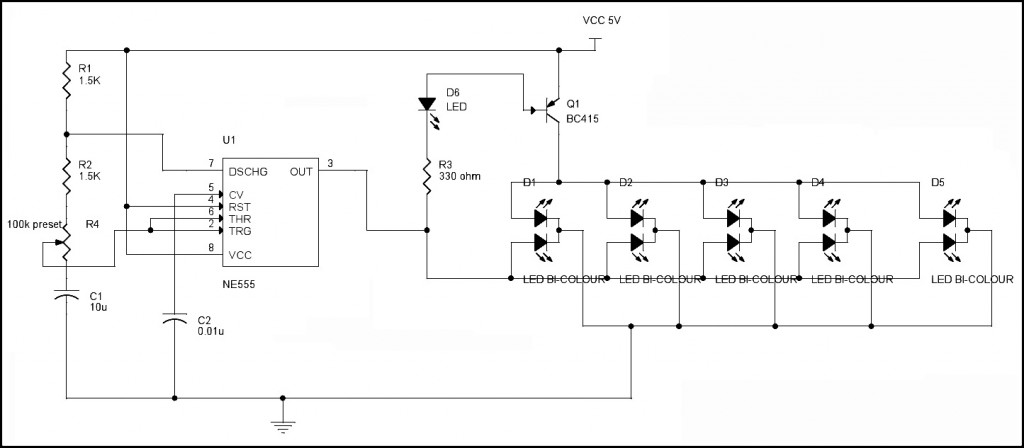
LED Flasher Circuit Diagram:

LED Flasher Circuit Diagram
Circuit Explanation:
  • The 555 timer is made to be configured as a astable multivibrator. The potentiometer which is connected to the timer should be preset and also to adjust the blinking or flashing speed of the LEDs.
  • The bicolor LEDs are used in this circuit and connected to each other as shown in the schematic. The PWM signal is the output of the 555 timer given to transistor, which acts as an inverter. When the pulse generated by 555 timers is low, transistor will get ON and LEDs will get ON. When the input of transistor is high, transistor will get OFF and LEDs are made OFF. This ON/OFF of LEDs will go for every pulse width signal cycle. This mechanism will make the LEDs flashing.

LED Blinking Circuits Applications:

  • Dancing LED circuit can be used for any visual sign indication in any highways or it can be used in advertisement hoarding also.
  • LED blinking circuit can be used in signaling purpose (It can be used as signal for help, if you are in danger)
  • LED blinking circuit can be used as flashing beacon.
  • LED blinking circuit can be used as vehicle indicator when it is broke down in the middle of the road. It can be used in operation theaters or offices as an indication that you are engaged in work.
  • There are lots of applications with these two circuits.

Read more...

AUTOMATIC PLANT IRRIGATION SYSTEM USING IC 555 TIMER

AUTOMATIC PLANT IRRIGATION SYSTEM USING IC 555 TIMER

Here is a simple project more useful in watering plants automatically without any human interference. We may call it as Automatic plant irrigation system. We know that people do not pour the water on to the plants in their gardens when they go to vacation or often forget to water plants. As a result, there is a chance to get the plants damaged. This project is an excellent solution for such kind of problems.

Block Diagram of Automatic Plant Irrigation System:

Block Diagram of Electronic Plant Watering System
Explanation:
  • Circuit is not that much complicated. We use the basic concept in this circuit i.e. soil have high resistance when it is dry and has very low resistance when it is wet.
  • By using this concept we will make the system work. We insert two probes in the soil in such a way that that they will conduct when the soil is wet and they will not conduct when the soil is dry. So, when the probes do not conduct, system will automatically detect this condition with the help of HEX inverter which will become high when the input is low.
  • HEX inverter will trigger the NE555 Timer and this NE555 timer will trigger another NE555 which is connected to the output of first NE555. Now the second NE555 which is configured as astable multivibrator will help to switch on the Electric valve and as result, it will allow the water to flow to the soil.
  • When the water wet the soil, probes will again conduct and make the output of 7404 low which will make the first NE555 to low and also drive remaining circuit to low. So, automatically it will switch off the valve.
Main Components in Automatic Plant Irrigation System:
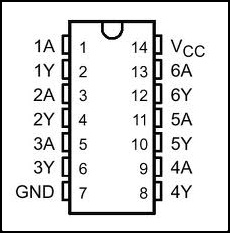
Hex Inverter 7404: the main function of the inverter is to give the complemented output for its input i.e. it will give output which is opposite to input. For example, if the input is low to the inverter, then the output will be high. Just like the normal inverter which gives high output when the input is low and gives low output when the input is high. 7404 IC will be having six independent inverters; Operating supply voltage is around 4.75V minimum to 5.5V maximum, normal supply voltage is 5V. They are used in different applications like inverting buffers, drivers, hex inverters etc. 7404 IC will be available in different packages like DIP (dual inline package), QFP (Quad Flat Package) etc. The pin configuration of Hex Inverter 7404 is shown below.
Inverter Pin Configuration

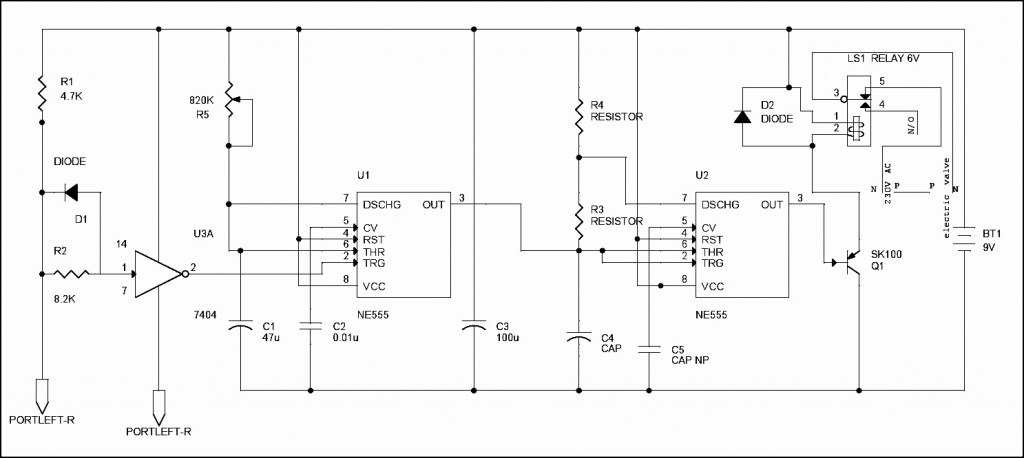
Circuit Diagram of Automatic Plant Irrigation System:

Circuit Diagram of Electronic Watering Plant System
Circuit Explanation:
  • We are all well aware that the plants will die due to lack of water in the soil. Soil will have high resistance when it is dry and it will have very low resistance when soil is wet. We use this simple logic to water the plants and make the circuit work.
  • Two probes which are connected to the circuit are placed into the soil. The two probes will conduct only when soil is wet (resistance is low) and they cannot conduct when soil is dry due to high resistance. The voltage is given to the probes to conduct is given from the battery connected to the circuit.
  • When the soil is dry it will produce large voltage drop due to high resistance. This is sensed by 7404 hex inverter and makes the first NE555 timer trigger which is configured as monostable multivibrator with the help of a electrical signal.
  • When the first NE555 is triggered at pin 2, it will generate the output at pin 3 which is given to the input of second NE555 timer. The second 555 timer is configured as astable multivibrator which got triggered by the first 555 timer and will generate the output and drive the relay which is connected to the electrically operated value through the transistor SK100. You can use a heat sink for SK100 transistor if it is dissipating more heat.
  • The output of second NE555 timer will switch on the transistor SK100 which will drive the relay. Relay which is connected to the input of electrical value and output of value is given to the plant plots through the pipe.
  • When transistor has turned on relay, it will open the valve and water is poured on to the plants pot. When the water content in the soil is increased, the resistance in the soil will get decreased and conduction of the probes will get started which will make the 7404 Inverter to stop the triggering of first 555 timer. Ultimately it will stop the electrical valve which is connected to the relay. Variable resistor (R5) and capacitor (C1) are used to adjust the valve when to we want to conduct the probes.
  • The capacitor C5 (0.01uf) is used to ground, the CV pin of second NE555 timer. C3 will remove the AC noise and allow only DC to the remaining circuit. C4 and R3 will constitute to configure the NE555 in astable multivibrator.
Values of the Components in the Circuit:
  • Capacitor (C4) = 10u 16V.
  • Capacitor (C5) = 0.01u.
  • Resistor (R3) = 27K
  • Resistor (R4) = 27K
  • Diode (D1 and D2) = IN4148
  • Relay = 6V, 150 ohms
Note:
  • Battery should be continuously monitored from power outage or simply you can use 9V DC supply adaptor.
  • Probes must be inserted into the soil. They should not be kept on the soil.
  • Electric valve should be used for best result.

Read more...

water level indicator and controller using 8051 micro controller

This article explains you how to detect and control the water level in an overhead tank or any other container. This system monitors the water level of the tank and automatically switches ON the motor when ever tank is empty. The motor is switched OFF when the overhead tank or container is FULL. Here the water level of the tank is indicated on LCD (Liquid crystal Display). Using this system, we can avoid the overflow of the water. We have already seen How water level indicator circuit works using AVR Microcontroller in the earlier post. But, here we are designing the circuit which is used to detect and control the water level automatically in overhead tank using 8051 microcontroller.
In this system water sensing can be done by using a set of 4 wires which are placed at different levels in tank. DC supply probe is placed at the base of the tank.

Water Level Controller using 8051 Circuit Principle:

This system mainly works on a principle that “water conducts electricity”. The four wires which are dipped into the tank will indicate the different water levels. Based on the outputs of these wires, microcontroller displays water level on LCD as well as controls the motor.

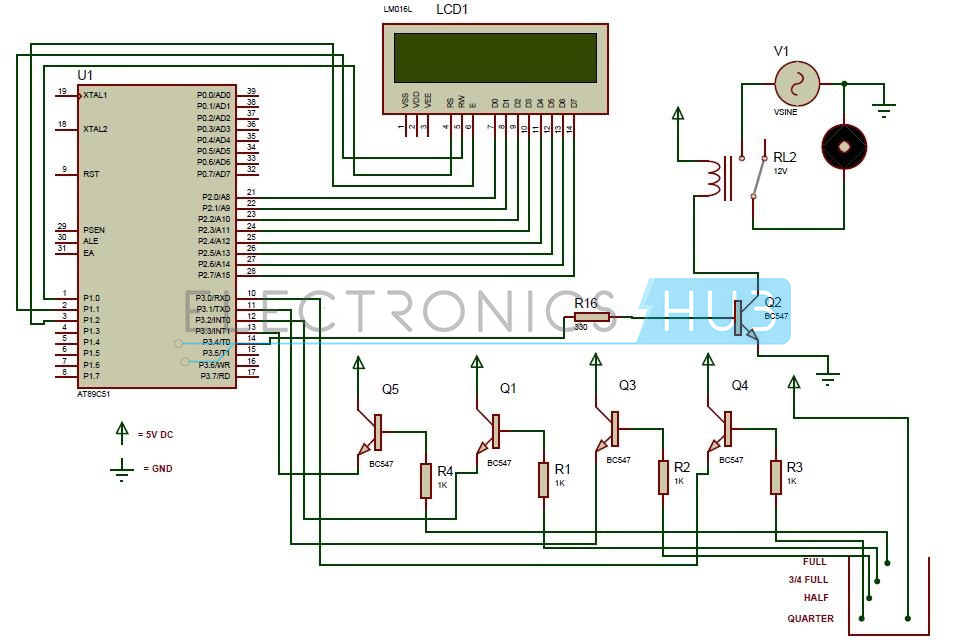
Circuit Diagram:

Circuit Diagram of Water Level Controller using 8051 Microcontroller
Circuit Components:
  • At89c51 controller
  • At89c51 programming board.
  • 16*2 LCD
  • 5V Relay
  • Bc547 (NPN) transistors – 5
  • Resistors (1K) – 4
  • Resistor – 330 ohm
  • AC Motor
  • Pot – 10k
  • Programming cable
  • Connecting wires

Water Level Controller using 8051 Circuit Design:

The main heart of this project is AT89C51 microcontroller. The water level probes are connected to the P3.0, P3.1, P3.2, and P3.3 through the transistors. Port P2 connected to the data pins of LCD and control pins RS, RW and EN of LCD are connected to the P1.0, P1.1, and P1.2 respectively.
Initially when tank is empty, LCD will display the message EMPTY and motor runs automatically. When water level reaches to quarter level, now LCD displays QUARTER and still motor runs. For further levels, LCD displays the messages HALF and ¾ FULL.
When tank is full, LCD displays FULL and motor automatically stops. Again motor runs when tank is empty.


Algorithm for Water Level Controller Circuit:

  • First configure the controller pins P3.0, P3.1, P3.2 and P3.3 as inputs and P3.4 as output.
  • Now initialize the LCD.
  • Continuously check the water level input pins P3.0, P3.1, P3.2, and P3.3
  • If all the pins are low then display tank is empty on LCD and make P3.4 pin high to run the motor automatically.
  • High pulse on the pin P3.0 indicates quarter level, display the same thing on LCD.
  • If P3.1 is high then water level is half.
  • High pulse on P3.2 indicates 3/4th full of the tank.
  • If P3.3 is high then tank is full, now make P3.4 pin is low to turn off the motor automatically.

How to Operate Water Level Controller Circuit using 8051 Microcontroller?

  1. Initially burn the program to the controller.
  2. Now give the connections as per the circuit diagram.
  3. While giving the connections, make sure that there is no common connection between AC and DC supplies.
  4. Place the 4 water level indicating wires into the small tank.
  5. Switch on the supply, now the motor will run automatically as there is no water in the tank.
  6. Now pour the water, when it reaches to quarter level then LCD displays QUARTER on LCD.
  7. For further levels it will displays HALF and ¾ FULL on LCD.
  8. Still if you pour the water then LCD displays FULL and motor turns off automatically when the tank is full.

Water Level Controller Circuit Advantages:

  • Human effort is reduced as the system controls the motor automatically based on the water level.
  • This system consumes less power.
  • Simple and more reliable.

Applications of Water Level Controller Circuit using 8051:

  • Used in big buildings where the manual monitoring is difficult.
  • Used in industries to control the liquid level automatically.

Read more...

B.Tech EEE Projects,EEE Final Year Projects for Stedents

   EEE refers to Electrical and Electronics Engineering. Nowadays most of the students showing interest to join in this branch to complete their B.Tech successfully and to build good career in future. In EEE, they can learn different concepts on electronics and complete their project in final year. Many of them try to do creative and innovative projects. Some of them also try to do the projects which may be helpful in real life.
For their purpose, here we have listed few best projects ideas from various categories like embedded, electrical, robotics, DTMF, GSM, RF, RFID, etc. Most of these EEE projects ideas give a better idea in electronic circuits and their functionality. These ideas are collected from different sources for the convenience of EEE students. We hope these EEE projects ideas are very useful for engineering students in completing their B.Tech successfully.

       Please refer this page:    Projects

Read more...

How to add embed video of youtube video to blogspot blogs

Steps for Youtube Embed Videos for Blogs: 


  1. First loging in blogger account.
  2. after logged in ur blogger account dash board will appear.
  3. Then click on the new post.
  4. Then appear compose and Html.
  5. enter some data on compose and then click on html.
  6. Then past the embed video code on that.
  7. if you dont know the how to copy the embed video on youtube fallow the steps
  8. open the video on youtube what video you want.
  9. then right click mouse on youtube video
  10. select embed video and copy the embed code
  11. Then past it on Html in your blog post

Read more...

Home Made Speaker box DIY using,used diet coke tin simple make

Home made speaker box used with deit coke bottle it is simple to make.speaker cost is very less 8ohm , 0.4 watt speaker used.It can used as multimedia speaker to connect pc and as well as laptop also...
construction is very simple you can make at home without using tools and cheap. You can also see the video below then you can understand easily.....

Read more...

Monday 4 November 2013

How do i connect laptop to tv

Your laptop screen is not the best medium for watching movies on, unless you enjoy squinting at a cramped display, of course. Thankfully, piping digital media - online and off - to your TV has never been easier, so whether you're looking for the right cable to physically connect your laptop and TV, or you want to investigate wirelessly streaming content to your television, you've come to the right place.

What do I need to connect my laptop to my flat-screen TV?

All flat-screen TVs offer at least one HDMI port on the back for connecting to external devices, and the same is true for practically all laptops manufactured in the last five or six years. HDMI is by far the best cabled solution available because not only does it support Full HD (and beyond) signals, but you only need one cable to carry both video and audio from your laptop to your TV.
You could spend a small fortune on expensive HDMI cables, but the truth of the matter is that for HD video transmitted from your laptop, any HDMI cable will do. Lindy is just one company that manufactures a wide range of cables of varying lengths at affordable prices.

Read more...

How do i connect laptop to tv

Your laptop screen is not the best medium for watching movies on, unless you enjoy squinting at a cramped display, of course. Thankfully, piping digital media - online and off - to your TV has never been easier, so whether you're looking for the right cable to physically connect your laptop and TV, or you want to investigate wirelessly streaming content to your television, you've come to the right place.

What do I need to connect my laptop to my flat-screen TV?

All flat-screen TVs offer at least one HDMI port on the back for connecting to external devices, and the same is true for practically all laptops manufactured in the last five or six years. HDMI is by far the best cabled solution available because not only does it support Full HD (and beyond) signals, but you only need one cable to carry both video and audio from your laptop to your TV.
You could spend a small fortune on expensive HDMI cables, but the truth of the matter is that for HD video transmitted from your laptop, any HDMI cable will do. Lindy is just one company that manufactures a wide range of cables of varying lengths at affordable prices.

Read more...

Sunday 20 January 2013

mother board repair and troubleshooting

It is difficult to get a piece of technology to work as good as it used to, once it's broken. Which is why most 'repair' procedures stay with hardware enthusiasts, because the best option for most other consumers is to replace it. With that in mind, we look at the resources that we have and try to get the best out of it.

The motherboard is located inside the cabinet and consists of a microprocessor, chipset and BIOS (Basic Input/Output System). The microprocessor decides the type of Central Processing Unit (CPU). The chipset constitutes two bridges: the north bridge and south bridge. These bridges control the flow of data in the computer. The basic functioning of the computer is controlled by the BIOS, which is a real-time clock and a major component of the motherboard. The slots and ports on it connect the computer peripherals like the sound card or graphics card. These slots provide a connection between the hard disk and the computer peripherals.

Troubleshooting a Bad Motherboard

Hardware diagnostics can be a pure pain in the ass. There is literally too much going on in there to efficiently dissect the faulty stuff and repair it. This is why most repair work is usually done by professionals or hobbyists. It takes a long time to get a full grip on handling hardware issues with precision. That said, there are a few common problems with pretty easy solutions as well. Let's have a look at the MoBo (motherboard) itself for any repair options.

Replacing Capacitors
The constant problem of popping capacitors is well-known by professionals and enthusiasts alike. Capacitors are the first thing to blow in a well-built electronic unit. The problem persists wherever a capacitor is used (commonly called the 'Capacitor Plague'). The only option to this is to replace the capacitor with a new one. Spotting a bad capacitor is easy: it's the one with the bulging top and leaking electrolytic goo. Most capacitors expel the electrolytic fluid inside them. It either dries up on the outer part of the top of the capacitor or leaks on to the circuit board. Worst-case scenario, the capacitor explodes due to too much electrical stress. If you see no damage on them, you can still check them using a capacity gauge or a multimeter.

To replace the capacitors, you will need:

a program-controlled soldering station with both soldering and de-soldering irons,
genuine capacitors of the same capacity as the old ones and
experience in soldering and knowledge of the risk involved.

Because one false move and you'll damage the internal circuitry of the board and lose the board completely. You have to de-solder the pins from under the board, take the dead capacitor out, put the new one in and solder the pins back; all in one shot. You need to be extremely cautious about the polarity of the capacitor. If you put it in the wrong way, the capacitor pops almost as soon as you power it up.

Motherboard Component Diagnosis

POST Check With Beep Codes
To diagnose a problem, you need to know where to look. The first stop would be the BIOS POST (Power-On Self-Test). If your computer (not your speakers, your cabinet) makes beeping sounds when you start it up, it means there is a problem with certain part/s on the MoBo. This is good (relatively speaking) because the beeps will directly tell you what's wrong. Pay close attention to the kind of beeping sound (the duration - short or long and the number of beeps). Search online for the 'computer beep code' and you should have found out which component is faulty. This will only work if the parts are on the verge of going down. If something does go down, your computer probably wouldn't start and you'll have to figure out the problem manually.

Read more...

how to repair mother board-repair solutions of pc mother board


game consoles 033.jpg
 This instructable will show you how to diagnose and repair bad capacitors on computer circuitry saving you money on new appliances and preventing landfills from filling up.

WARNING RISK OF ELECTRICAL SHOCK CONTINUE AT YOUR OWN RISK
Always unplug electronic devices before opening them!  Even after opening make shore you discharge all the capacitors with a discharge rod.
It is difficult to get a piece of technology to work as good as it used to, once it's broken. Which is why most 'repair' procedures stay with hardware enthusiasts, because the best option for most other consumers is to replace it. With that in mind, we look at the resources that we have and try to get the best out of it.

The motherboard is located inside the cabinet and consists of a microprocessor, chipset and BIOS (Basic Input/Output System). The microprocessor decides the type of Central Processing Unit (CPU). The chipset constitutes two bridges: the north bridge and south bridge. These bridges control the flow of data in the computer. The basic functioning of the computer is controlled by the BIOS, which is a real-time clock and a major component of the motherboard. The slots and ports on it connect the computer peripherals like the sound card or graphics card. These slots provide a connection between the hard disk and the computer peripherals.

Troubleshooting a Bad Motherboard

Hardware diagnostics can be a pure pain in the ass. There is literally too much going on in there to efficiently dissect the faulty stuff and repair it. This is why most repair work is usually done by professionals or hobbyists. It takes a long time to get a full grip on handling hardware issues with precision. That said, there are a few common problems with pretty easy solutions as well. Let's have a look at the MoBo (motherboard) itself for any repair options.

Replacing Capacitors
The constant problem of popping capacitors is well-known by professionals and enthusiasts alike. Capacitors are the first thing to blow in a well-built electronic unit. The problem persists wherever a capacitor is used (commonly called the 'Capacitor Plague'). The only option to this is to replace the capacitor with a new one. Spotting a bad capacitor is easy: it's the one with the bulging top and leaking electrolytic goo. Most capacitors expel the electrolytic fluid inside them. It either dries up on the outer part of the top of the capacitor or leaks on to the circuit board. Worst-case scenario, the capacitor explodes due to too much electrical stress. If you see no damage on them, you can still check them using a capacity gauge or a multimeter.

To replace the capacitors, you will need:

a program-controlled soldering station with both soldering and de-soldering irons,
genuine capacitors of the same capacity as the old ones and
experience in soldering and knowledge of the risk involved.

Because one false move and you'll damage the internal circuitry of the board and lose the board completely. You have to de-solder the pins from under the board, take the dead capacitor out, put the new one in and solder the pins back; all in one shot. You need to be extremely cautious about the polarity of the capacitor. If you put it in the wrong way, the capacitor pops almost as soon as you power it up.

Motherboard Component Diagnosis

POST Check With Beep Codes
To diagnose a problem, you need to know where to look. The first stop would be the BIOS POST (Power-On Self-Test). If your computer (not your speakers, your cabinet) makes beeping sounds when you start it up, it means there is a problem with certain part/s on the MoBo. This is good (relatively speaking) because the beeps will directly tell you what's wrong. Pay close attention to the kind of beeping sound (the duration - short or long and the number of beeps). Search online for the 'computer beep code' and you should have found out which component is faulty. This will only work if the parts are on the verge of going down. If something does go down, your computer probably wouldn't start and you'll have to figure out the problem manually.

Read more...
Related Posts Plugin for WordPress, Blogger...

Random Posts

Recent Comments

Total Pageviews

Search This Blog

About Template

Digital Solutions - Technology Blog

  © Blogger templates ProBlogger Template by Ourblogtemplates.com 2008

Back to TOP